1- Puff pastry is all about butter… a lot of butter! Cut the butter into small cubes, place in a bowl, cover with a plastic wrap, and put it in the freezer for 1 hour before using it. We need frozen butter!
2- This is regular all-purpose flour that I am placing on my kitchen counter – you need some space to handle the puff pastry. Add the salt to the flour and mix well.
3- Now add the frozen butter cubes and mix them with the flour until they are covered.
4- Make a well in the center of the flour and pour about two-thirds of the water – remember, the water has to be very cold! Gently and slowly, mix in the flour with the water.
Note: Notice, I am doing minimal work – just making sure that the flour is absorbing the water. I am also squeezing the butter so it starts breaking a bit.
Step 2: First Dough Ball
1- I am using a pastry scraper to mix the dough – it’s a really nice baking tool! But if you don’t have it, you can use a spatula instead. With the scraper, bring in the flour to the center and cut through the butter with the scraper, very gently.
2- You don’t want to overwork this dough. Now add the rest of the water, and continue to mix gently the butter and flour using the same technique, until the they are lumped in together in a rough ball.
3- At this point, we are going to change the way we mix in the dough. Cut through the ball with the scraper and place one half of the dough on top of the other, and squeeze them together by pushing from the top with your hands.
4- Do it a few times times, until you get a dough ball that holds itself. Notice that there are still big chunks of butter in the dough ball – and that’s exactly what we want.
Step 3: First Rolling
1- Lightly flour your work surface, the top of the dough, and also your rolling pin. Press the dough with the rolling pin and shape it into a rough rectangle.
2- Fold the dough in thirds in the width, folding the bottom third up, towards the center, and the top third down, on top of the folded bottom layer.
3- Wrap in a plastic sheet and place in the fridge for 30 minutes.
Step 4: 5 more rolls!!!
1- Clean your surface with the pastry scraper and go do something fun until the next step
2- Here we go again, 30 minutes later, this is the 2nd roll.
3- Lightly flour your work surface, the top of the dough, and also your rolling pin. Press the dough with the rolling pin and shape it into a rectangle – around 6 by 18 inches. Use the scraper or spatula to smooth the edges – so you have a perfectly shaped rectangle!
4- Fold the dough in thirds in the width, folding the bottom third up, towards the center, and the top third down, on top of the folded bottom layer.
5- Now, mark the dough with your fingers – make 2 prints – it shows that you rolled the dough 2 times already. That’s because we have to do it 6 times!!! But I promise, this trick will help, because you will forget where you stand.
6- Place the dough in the fridge for 30 minutes.
7- Clean your work space – wait, and do it again. The third time. Then to the fridge.
8- The fourth time, Then to the fridge. The fifth time, then to the fridge.
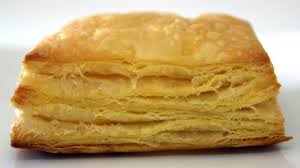
9- And finally here is the last time. You notice that the dough is smooth, it actually has a really nice texture when you touch it. Roll as you did before and that’s it! We are done!
Step 5: Final steps!
1- Wrap the dough in a few layers of plastic wrap so it does not create a crust when refrigerated.
2- If you want to use it the same day, leave it in the fridge for 1 hour before using it.
3- If you want to use it later, you can freeze it for up to 2 weeks. Just move it from the freezer to the fridge the night before and roll it out. Now enjoy it in croissant, pies, cheese twists, or many other recipes!
Ingredients 6 skinless, boneless chicken breast halves 6 slices Swiss cheese 6 slices ham 3 tablespoons all-purpose flour 1 teaspoon paprika 6 tablespoons butter ½ cup dry white wine 1 teaspoon chicken bouillon granules 1 tablespoon cornstarch 1 cup heavy whipping cream Instructions Pound chicken breasts if they are too thick. Place a cheese and … Read more
1. Take 1 cup ( 125 gms) refined flour in a bowl, Add 1/4 cup (20 gm) corn flour to it. Add 1/3 tsp salt and 3 tsp oil. Mix all the ingredients well. Add little quantity of water to knead a soft dough like that of a paratha. To knead this much quantity of dough, we used less than 1/2 cup of water. Knead the dough. Cover and keep the dough aside for 15 to 20 minutes to set.
2. After 20 minutes, the dough is also set and ready. Knead and smooth the dough for 2 to 3 minutes. Once the smooth and soft dough is ready. Break the lumps from the dough then make small dough balls and give them a round shape. Then press it and give it a shape of a peda.
3. To roll out the wrappers take a rolling board. Then Pick up a dough ball. Take a little dry refined flour, dust the dough ball with it and roll it out in a round shape with 3 to 4 inch diameter. Dust it again if it sticks to the rolling board. Once rolled out and ready, place it out on a plate. Likewise roll out all the pooris for wrappers.
4. Spread a little oil over the poori on all sides. Then sprinkle a little dry refined flour over it and spread it. Place one poori over another sticking the edges. Press them with hand and stick them. Lift and dust in dry refined flour and roll it out thin and big. Flip it and roll out as big a poori as you want the wrapper to be.Make sure you roll out the pooris from the sides. We have rolled it out thin in a diameter of 7 to 8 inch.
5. Heat the girdle and grease it with a little oil. Wipe out extra oil with a tissue and keep the flame very low. Once the girdle is hot, place the poori to roast and let it roast slightly from below. When poori is roasted from below and dark from above then flip it to slightly roast it from the other side. Rotate the poori with help of a tissue. Poori is roasted from the other side as well.
6. Place it out on a board and separate the wrappers. Open it from the joints. Transparent and thin wrappers are ready.
Serving
7. Thin wrappers are ready you can use them to make snack for parties. You can keep them in a polythene and keep it in fridge and prepare yummy and sumptuous snacks instantly for 3 to 4 days. You can make this wrapper in advance for any party as it will save the time and effort.
– 600 grams of glutinous rice
– 2 tsp of sugar
– 2 tsp of dark soy sauce
– 1 tsp of sesame oil
– 1 tsp of salt
FOR THE STIR-FRY FILLINGS
– 6 pieces of dried mushroom
– 50 grams of dried scallop
– 80 grams of dried shrimp
– 100 grams of peanuts
– 2 tbsp of vegetable oil
– 1 tbsp of soy sauce
– 1/2 tsp of black pepper
– 1/4 tsp of salt
FOR THE CHICKEN MARINADE
– 250 grams of chicken thigh
– 1 tbsp of soy sauce
– 2 tsp of cooking wine
– 1 tsp of dark soy sauce
– 1 tsp of five spice
– 1/4 tsp of salt
OTHER THINGS
– 12 salted egg yolks
– Some rope
Instruction
THE NIGHT BEFORE
– Put a tsp of vegetable oil into the water. Boil the dried bamboo leaves for 5 minutes. Soak it in the water overnight. Each zongzi needs 2 pieces of leaves, but you might want to prepare more leaves in case some of them break or are not the right size.
– Cut the chicken into the size you like. Marinate it with 1 tbsp of soy sauce, 2 tsp of cooking wine, 1 tsp of dark soy sauce, 1 tsp of five spice, 1/4 tsp of salt. Let it sit in the fridge overnight.
– Wash the glutinous rice really well. Soak it overnight.
– Soak the dried mushroom, dried shrimp, dried scallop and the peanuts with water overnight.
NEXT DAY
– Drain everything.
– Cut the mushroom into small pieces. Rip the scallop into small pieces, too.
– Use 2 tbsp of vegetable oil and stir fry the mushroom, shrimp, scallop and peanuts on medium heat for 3 minutes. Add 1/2 tsp of black pepper, 1/4 tsp of salt, 1 tbsp of soy sauce to adjust the taste. Turn off the heat and set it aside.
– Drain the glutinous rice. Add 2 tsp of sugar, 1 tsp of salt, 2 tsp of dark soy sauce, 1 tsp of sesame oil. Mix it well and set it aside.
– Take the bamboo leaves out of the water.
– The ingredients can be switched with anything you like. You can put beef, pork, sausage, bacon. Or other types of nut, like chestnut. Basically, you can make your own filling.
MAKE THE ZONGZI
– Tie one side of the ropes somewhere. This is super helpful especially if you are doing this alone. The rope needs to be long enough to tie 5-6 circles. I think 1.2 m is perfect.
– Take 2 bamboo leaves. Wipe the water off. Fluffy side (you can see the stem is very obvious) face down. The front side needs to face up- it feels smooth.
– Put them together- one on top of the other one.
– Fold it from 3/8. Make it into an ice cream cone shape. Make sure there is no hole on the bottom, so the rice won’t drop.
– Put 1 tbsp of glutinous rice in it. Press it down, tightly pack it in.
– Add in some fried fillings we prepared, some chicken.And 1 salted egg yolks.
– Add enough glutinous rice to cover it. Press it again to make sure it is flat and tight.
– Right-hand holds it. Use your thumb and forefinger to press two sides in. Left-hand folds the upper leave down.
– The last part is that you have to wrap it up along the surface and follow the shape of the zongzi.
– Use the rope to tie a few circles from the center.
– The amount I gave is enough to make 12 – 15 zongzi. So we need to finish the rest.
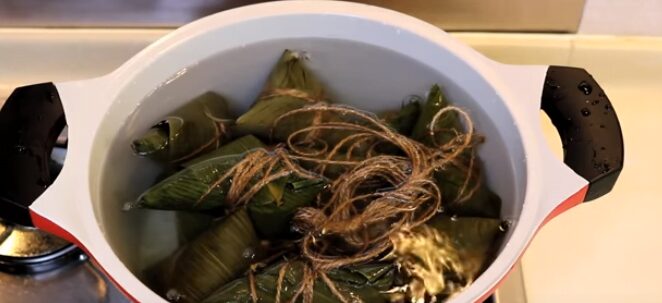
– The water should completely cover the zongzi. Boil the zongzi for 2-3 hours, depending on the size. During this time, add more water if you need it.