Ingredients
Part 1: Chicken
- 1 whole chicken
- ½ tbsp. salt
- Water to cover chicken
Part 2: Rice
- ½ kg. uncooked rice (I used high quality Thai jasmine rice, nice and fragrant)
- About ½ liter of chicken stock broth (this was an estimate, really you should use about 1 cup of rice to 1.8 cups of chicken broth, or whatever ratio you normally use)
- ⅛ tbsp. salt
- 50 g. Thai garlic (regular garlic will work too)
- Chicken oil for frying (or vegetable oil will work well too)
Part 3: Soup
- All the rest of the chicken broth
- ½ winter melon (about ½ kg or so) – you can also use daikon radish, or even nothing
- Sprigs of cilantro
- Salt to taste
- Pepper to taste
Part 4: Sauce
- 50 g. ginger (old and strong ginger is best)
- 50 g. garlic (peel the garlic)
- 5 – 10 Thai bird chilies (depending on how spicy you want it)
- 1 stalk of cilantro roots
- About 3 tbsp. of fermented soy bean sauce (you can add more later if not salty enough, but it can be quite salty), if you can find the Thai version, that will be best)
- 2 tbsp. white vinegar (normal distilled white vinegar, NOT apple cider or rice)
- 1 tbsp. sugar
- ½ tbsp. dark soy sauce (kecap manis)
- About ¼ – ½ cup of chicken broth, but more if it’s too salty or too thick
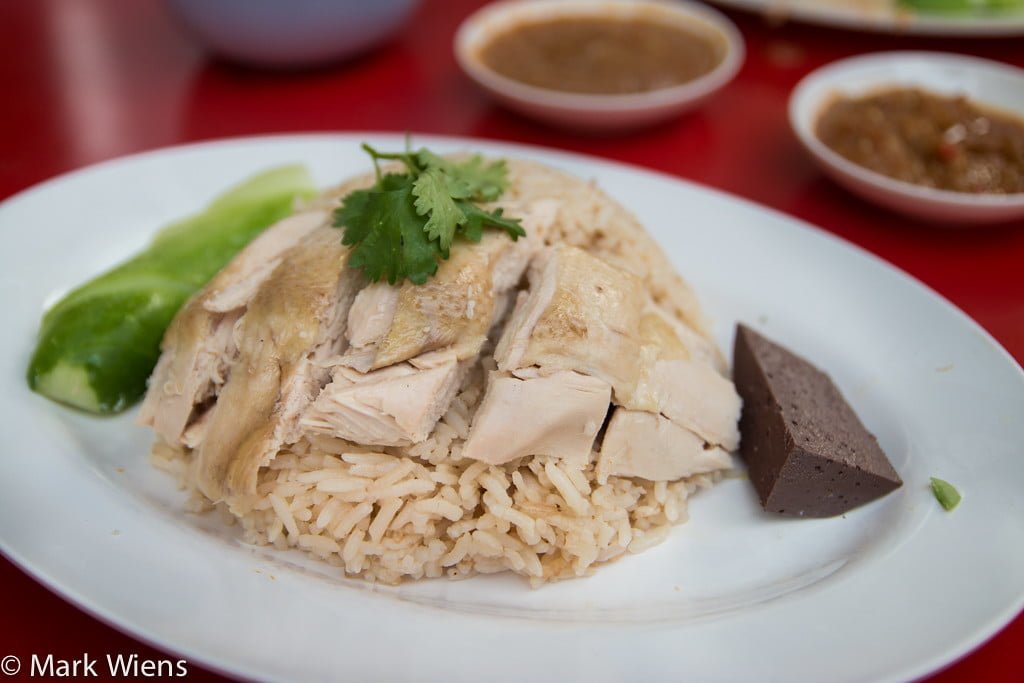
Garnish
- Cucumbers to garnish
- Cilantro to garnish
There are 5 parts to this recipe:
- Chicken
- Rice
- Soup
- Sauce
- Serving it Thai style
Instructions
Part 1: Chicken
- I’m not sure how you will buy your chickens, but in Thailand, I went to the market, and bought full chickens, which come with head and all insides in-tact. If your chicken hasn’t been de-gutted, you’ll need to first carefully remove the entire organ system. You have to cut a slit in the back of the chicken, about 6 cm in length, and then reach in with your hand to remove all the organs. Be careful not to break the intestines or innards as it can cause the chicken to get bitter.
- Once your chicken is de-gutted, stuff the feet of the chicken into the body cavity, and then twist the wings to the top of the chicken – this is just going to keep its limbs from flapping while being boiled.
- Put enough water into a pot to cover your chicken, and then bring it to a boil (chickens not in yet). Once your water is boiling, reduce the heat to low.
- Add the salt into the water and dissolve it.
- Add the chickens to the boiling water and boil them for about 35 – 45 minutes, if you’re only doing one chicken it might only take 30 – 40 minutes – so just keep an eye on it. If you have a meat thermometer, that could come in handy.
- Once the chicken is firm and bouncy, you can remove the chicken from the pot, and lay it in a pan to cool.
- That’s it for the boiled chicken.
Part 2: Rice
- For a proper Thai street food version of khao man gai (ข้าวมันไก่), you need to have some chicken oil. I made some by taking extra chicken skin, putting it into a hot wok for about 10 minutes and sizzling all the oil out of it – we probably had about 1.5 cups of chicken oil. However, if you don’t want to use chicken oil, you can also just use any kind of vegetable oil.
- Take the garlic, and blend it up, or use a food processor. Alternatively, you can just mince it up as well. In Thailand they just use the full cloves of garlic, without even taking off the skin.
- Then take the minced garlic and deep fry it in either the chicken oil or vegetable oil. You want to fry it on a medium low heat, and stir it continually in the oil so the garlic doesn’t stick. You want the garlic to become nice and golden brown, without burning or getting too dark. It should take about 5 – 8 minutes.
- Once your garlic has been fried, strain and drain it.
- Add your uncooked rice to a rice cooker pot, and first give it a good rinse and drain.
- Add the fried garlic to the uncooked rice, along with the chicken broth (from cooking the chicken), and a bit of salt to taste.
- Stir the uncooked rice and broth all around, even it out in the pot, and finally press cook on your rice cooker. Let the rice cooker work its magic.
- When the rice finishes cooking, let it sit for a few minutes, and then open the cover and just fluff it up.
Part 3: Soup
- Cut up your winter melon or daikon radish into about 5 cm pieces. For the winter melon, I first sliced off the skin, then cut it into quarters, removed the seeds, and sliced it into pieces.
- Go over to your chicken broth, and try to skim off the top layer of oil, and discard.
- Now bring your chicken broth to a boil, and then add in the pieces of winter melon or radish.
- While your soup is boiling, you can go ahead and add in as much salt and pepper to your tasting. It shouldn’t be too salty or too peppery, you’re looking for just a soothing broth.
- Boil your soup for about 15 minutes or so, until the winter melon or daikon radish is soft.
- Final step for the soup is to turn off the heat, take a handful of cilantro, chop it up, and toss it in. Give that a quick stir, and it’s ready.
Part 4: Sauce
- For the sauce, just chop up the ginger, and then just throw it, with all of the ingredients into a blender or food processor.
- You don’t need to blend it up completely, it can be a little chunky (depending on your preference).
- Transfer your blended sauce over to a pot or wok, and you want to just bring it to a boil for a few seconds – this is not really for any reason other than to kill any bacteria and make your sauce last longer (this sauce should last in the fridge for about 3 – 4 days, but of course it probably tastes the best when it’s freshest).
- Pour the sauce into a bowl and it’s ready to be eaten.